Recent Posts

Friday 24 March 2017

Pola G 331019, G-Scale detached house

One of my priorities for this year's garden season is to establish a small town on my G-scale layout. I obviously need houses for that. I'm not yet sure how many I require, so I'm just starting with one. Once I install it, I will have a better idea about what exactly I want to add next...

The model I went for this time is Pola G 331019. It's the cheapest of the "big houses" available on the market. It does not mean it's cheap at all, so I won't be revealing the price here in case my wife reads the blog.

It comes in a pretty big and very heavy box...


It weights over 5kg (11lbs). It's probably the heaviest single model product I've ever bought. Let's hope this weight translates into quality.

Opening the package reveals the usual content. The largest parts reside at the very bottom while the more fragile ones are delivered in smaller inner boxes. Glue is not included.


Here's the content of the outer box. Roof parts, some wall parts and the decorations.


I'm starting to understand where the weight comes from. The biggest elements are as thick as my finger.


And here's the content of the inner box #1...


and #2.


This looks like a lot of parts. I think I'm going to enjoy that!

The manual is 8 pages long. It's very detailed and clear. All the parts are numbered, too.


The build follows the usual pattern. First - the walls...


...which, when connected, form the base structure.


Then - the roof sides which need separate preparation...


...and make the raw building complete once installed.


As soon as the details are added, the house is finished. I took it slowly and enjoyed it for five evenings. But if your were in a hurry, you could probably build it in a day (reserving some time to allow the glue to make a strong bond).


Let's see it from various angles:


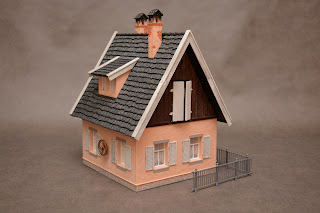
It looks good. I'm not a fan of this particular house design, but I have to admit the model looks realistic and nice overall. The bay window is an interesting idea and it makes the model stand out.

The door of the house open and close (but it doesn't fall inside) and so do the shutters on the upper floor. The bench is an appreciated extra piece but the fence does not really make sense at all. It would be useful if there was enough to encircle the house, but there isn't.

The model definitely makes an impression of a sturdy item. The 5kg of plastic feels like it will last. There are also barely any fragile details which I personally consider a very good solution!

It's time for the interior lighting test. I'm using my own LED-based solution here. Let there be light!


That's a nasty surprise. The model leaks light in several places. Additionally the white door looks like it's semi-transparent. I did not expect that kind of problems at this price level.

Small leaks can be patched with remaining plastic parts coming from the set. But there were two larger areas where I had to use an element from another model and a 3D printed rectangle 9 by 11cm in size.


Let's repeat the test. Yes, the leaks are gone. With one exception - the very bright looking front door.


I've enjoyed assembling the set a lot. And I also think the final result is very promising. It looks good and definitely feels fit for outside exposure. One disappointment is the need to fix some of the thinner walls to keep the light inside. It was easy to do but honestly - this should not be needed in cases of the more expensive models at all. Other than that - I'm very happy with the product and can't wait to allow the first settlers to establish my town :)

Sunday 12 March 2017

3D printed G-Scale rowboat

Today's post is going to be short. I just want to show the G-scale boat I promised to make in my previous 3D printing article. It's ready, it looks nice and it floats pretty well:


I have again started with a design from another Thingiverse member: http://www.thingiverse.com/thing:646788. The changes I had to make were very small. I've only scaled the model and moved the seats a little bit higher. The latter modification was not really required though. And once again - Thingiverse rocks!


The printing process took about 5 hours. Here's a time-lapse video showing it in less than 2 minutes.


It turned out really good and with every day and I'm more and more satisfied with my cheap 3D printer. It definitely requires maintenance and it refuses to work at least bi-weekly. Everything is however fixable and the results are very, very satisfactory.

Thursday 9 March 2017

Eaglemoss Electric Train collection, Issues #2 & #3

The first package of my Electric Train collection subscription has arrived. Just two weeks after I ordered it. It contains quite a lot of stuff. Here's what I got:


Two issues of the magazine are included. They're pretty similar to issue #1. Each is 16 pages long and follows the same pattern when it comes to content:
  • layout building instructions
  • a selected locomotive description with a poster
  • a train themed article


Issue #2 helps the newbies build a layout base. It's a very basic stuff but it's nicely described.


Issue #3 explains making buildings from plastic parts. Again - useful only for those who never created any model...


The set includes a free magazine holder. How cool is that? Well, not really that cool...


What else? Here comes the interesting part...

Four large pieces of colorful paper are included and these are the "base" for the world. I knew such pieces were coming but I somehow assumed they would only help in positioning the actual terrain, which in turn would be built from scratch. But now it's clear - we're supposed to glue the paper onto the wood. And the paper layer is the actual surface of the layout.

This is a major disappointment. It means the landscape will be very limited. There will be no track ballasting and no roads painting. And most of the look will be based on a paper printout, which is not really a lasting material.


And now the core of the package: a plastic house, a turnout and a lantern.


Let's start with the track piece. It's of a similar quality as the element in issue #1. Meaning: it's not really good but with a little luck it might be good enough. The mechanism in the switch works pretty well, but I really do not like the kind of metal the rails are made of. It reminds me of my childhood layout, which required occasional usage of sandpaper to make the trains run at all...


The lamp is difficult to describe. It looks OKisch. It definitely works and seems to be a 16V light-bulb based model.


Let's take a look at the house. The back of the container reveals a surprise. The company that manufactured the model has a name. And its address is in China.


That's weird. Why are all the parts in one color? Well, it's because it's not a full model. It's only the first batch of elements for this building. The rest is coming later...


I have to say I feel disappointed. It seems I got so much but I can actually do very little. I could start building the base but I'd rather go with a smaller step first. Making a house model would be cool, but I don't have all the needed parts...

Was it worth the money? I'm not convinced. I've paid around $10 for this content and it's really not much at all. But I only got a fraction of what I needed to achieve any sort of a milestone. The building is the best example here: only a chunk of parts is included and I have no idea when the rest is coming. Moreover - I do know that a half of a different building will be included in the next issue. This means I will soon own two buildings, but none of those will be complete...

I guess that's the goal of the series: don't deliver complete elements too early and keep the subscriber attached. I can't say I like it. I'd rather have small successes early which would keep me going forward... Maybe I should rethink the subscription?

Friday 3 March 2017

3D printed G-Scale outhouse

A few weeks back I've presented my opinion on the Piko 62262 fishing cabin set. One thing I was disappointed about was the lack of accessories that could have made the product so much more attractive. Luckily I have now my own 3D printer and I'm able to correct PIKO's mistake by creating the missing elements myself. And here's the first one - a wooden outhouse.


Where did it come from? Obviously from the thriving community of 3D designers on Thingiverse!

I took an existing project published by another user (http://www.thingiverse.com/thing:1644652) and modified it to my needs. The model has been scaled, some elements have been corrected, and a stone base has been added. Once the G-Scale sized set was complete, I've posted it as my own "remix" under this link: http://www.thingiverse.com/thing:2146230


The project prints out as six elements. I've used different colors right away, but I guess I could have printed it in white and painted later as well. Most of the parts feature a wooden texture and pose a significant challenge for the printer. It took over 20 hours to yield all of those:


Then it's just gluing. I've used a regular plastic cement and the parts fit almost perfectly. Small pieces of filament can be used as pins for the hinges which allow the door to open and close as needed.


Easy peasy. Next comes the boat.