Recent Posts

Tuesday 25 April 2017

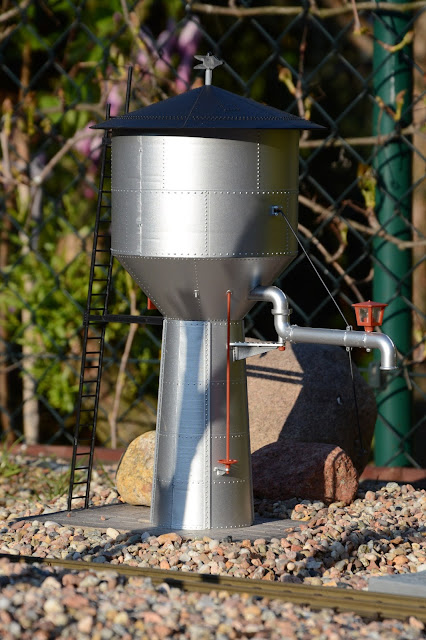
Pola G 330922, G-Scale railway water tower

And yet again, as I was making my purchase at the ArsTecnica store, I needed to fill my shopping basket "a little more" to get free shipping. Of course there was nothing of interest that would cost "a little" and I ended up buying a much bigger item. Seems the "free shipping" marketing method really works!

The article I've bought this time is Pola G 330922. It's a G-scale model of a railway water tower featuring a steel finish appearance. The product is no longer in production and is difficult to find at the moment. But knowing Pola G - they'll probably have a re-run sooner or later.

It comes in a rather small and light-weighted box.


There isn't very much inside. After all, it's not a big model. But one thing that is easily noticeable is how carefully the parts are packaged. Most of the bigger elements are separately wrapped in a protective paper and all of them have a clearly defined place in the box.


The manual is just 4 pages long but it is also very clear. The fact that every part is tagged definitely helps here.


Here are all the structure parts. The "steel" elements are very shiny and easily catch one's attention. A base element is included but unfortunately it feels very light. The set does not include any glue.


And here are the remaining parts. We get one sticker and two functional elements:
  • a rubber pipe which allows the model to have a real water flowing through its body
  • electrical wires with a light bulb that will illuminate the discharge pipe and its surroundings


Unlike the houses I usually assemble, the water tower is meant to be built simply from the bottom to the top. There are no preparation steps where one would - for example - create wall elements first. It's really refreshing not to follow the usual pattern for once.


As already mentioned the tower model features electrical and water functions. Those are located inside the spout and this fact has to be taken into account during the build.


There's a water storage element which goes inside the tower. It features a discharge mechanism controlled by a long rod. To use it one fills the container with water and unscrews the rod. This also requires that the roof part is not glued to the tower body, so it can be removed to allow a re-fill.


Once complete, the model looks very nice.


The supplied light element is a very welcome addition. Unfortunately it's a traditional light bulb and not an LED but that's fine. The more surprising fact is how strong the light is. The manual never mentions what voltage should be used to drive the light. I've just assumed the usual 16V. At this voltage it's just too bright for me...


...especially considering how thin the lantern part is. The light just shoots right through it. I'm definitely installing a resistor to decrease the illumination power.


I have to make a comment about the water function, too. Personally I find it useless and that is for two reasons:
  • I can hardly imagine any railroad fan actually making the effort to fill the tower with water just to see it going out. It might be fun once or twice but I don't believe anyone would keep doing this regularly.
  • The function requires the roof part not to be glued to the body. In my case it did not work that well. On the first windy night the roof flew away together with the small wind vane piece. Luckily I found them but the problem repeated the next night, too. After that, I've decided to glue the roof element for good.
In my opinion, it would not be too much of a loss if the water function was not there. Especially if it meant the model could be a little cheaper (yeah, right...).

Other than that, it's a very nice addition to my garden layout. Looks really cool next to my rural train station.

Sunday 9 April 2017

Preiser, Pola G and Scenecraft figures durability

It's still cold outside pretty often which makes it difficult for me to clean up my garden layout after the winter. I was however able to take a look around and one thing became clear - some of the "citizens" of my miniature world did not handle the harsh outside conditions all that well. Let's take a look at them.

I'll be focusing on the following six models. They were manufactured by Preiser, Pola G and Scenecraft. It's easy to see some of them look better than the others...


These are my two oldest figures. They've become exposed to the weather factors around 12 months ago. The figure on the left (Preiser) looks pretty good, the one on the right (Scenecraft) has definitely a very pale face.

Preiser 45123 vs Scenecraft 22-166
Another couple. Both reside on my station platform and both should be affected equally. However, it's clear the Scenecraft model (on the left) lost all of its skin color. The Pola G item looks almost as new.

Scenecraft 22-178 vs Pola G 331825
These two were installed around 7 months ago. And again - the Scenecraft figure did not take it well. The model of a traveler became a model of a zombie. The Preiser station worker looks perfect.

Scenecraft 22-188 vs Preiser 44920
Last comparison and this time it's Scenecraft against Scenecraft. The police officer on the left spent most of his time on the layout facing the sun. The one on the right was looking to the north. The difference in color of both models is clearly visible.

Scenecraft 22-145
The policeman on the right is missing his arm, too. He lost it when I dropped him accidentally today. Well, accidents happen. What's important here is that the arm is not the only thing that broke. Looking at his hat or his vest, we can notice small pieces of the paint missing. Seems that gluing the part back will not really recover the model. It is destined to lose all of its color sooner than later...

The conclusion? The Scenecraft figures are not really weather resistant. They look really bad just after a few months outside. To be fair, I have to point out they're much cheaper than Preiser or Pola G. But for an outdoor layout, they're clearly a poor investment, as they will require replacement/repainting after a very short period...

Monday 3 April 2017

Modern-looking 3D printed G-Scale street lamps

Finally! After weeks and weeks of planning, prototyping and 3D printing, my very own street lamps for my garden layout are finally here. And I have to say I'm truly proud to be able to present my creation to all of you.

Let me first share a little about how this project came to life. The reason why I even attempted designing my own road-side lamp model was very simple - I needed one for my 3D printer and couldn't find any. That's how I decided to create my own from scratch.

I've started by working in Blender. And since this phase took around 10 evenings, I've actually managed to learn the tool a little. It's fun working there, maybe except for the unpredictable Undo function. Solution: save often.


The design phase was not just about sitting in front of my computer. It required prototyping and a lot of it. Preparing a blueprint for something that looks good is one thing, but having it print well is something else.

Here are some of my early tests...


But I knew I was making progress all the time. And every next iteration of my lamp was better than the previous one. Two weeks later I finally had a prototype I was happy with.


My lamp is empty on the inside which allows wiring and resistor installation. The head features two micro-holes which fit a 5mm LED light source very well. It's really easy to use!


This is what my first fully functional piece looked like.


After that it was all about mass production. A single lamp takes about 3 hours to print (1.5 hour per side). I was printing only one per day which means I've spent around two weeks making those...


Wiring them up and gluing took another week. It could have been done faster if the time I spend on my hobby had not been limited...

Installation of the lamps on my road elements consumed most of my Saturday. Actually, I've finished the work when it was getting very dark already. In the end it turned out pretty well, because it allowed me to see the outcome of my actions very clearly. Here's what I saw once I turned the power on:


As we can see, placing the lamps straight is something I've yet to master. But it does look very, very good overall, especially for something I have made myself from scratch!

I have again shared my design on-line. If you want to try making the lamp yourself, here's the link: http://www.thingiverse.com/thing:2220722


I also want to bring up the topic of the cost...

1kg of printing filament can be bought for as little as $15. The lamp weights less than 15g which means we could easily make 65 pieces out of 1kg. The conclusion is that a single lamp's body costs around $0.23 (+electricity).

The model requires an LED, a resistor and some wire. 100 LEDs can be bought on Ebay for less than $3, 100 resistors for around $1. I've bought the cables locally and paid less than $0.15 per meter.

So putting the cost of the electricity, the glue and the solder aside, we can estimate one piece costs less than $0.50 plus your time. I honestly don't think there's a way to equip your layout with working lamp posts cheaper than this. How could I not recommend it then? Just go for it!