Definitely the thing I hate most in my life is visiting my dentist. But not very far behind is going shopping to the Ikea store. The maze of small rooms designed to force you to look at their entire offer and prohibiting you from focusing on the one thing you need is too much to me. I avoid this place as much as I can.
Turns out however, there are good things at Ikea after all. One of those could be the LIATORP coffee table.
No, I did not go to Ikea to buy it. I got it as a Christmas gift. The intent behind this present was to allow me to build a new train layout. One that could be permanently displayed in our living room. I'm so glad the Santa Claus is really considering my needs :)
The LIATORP table can be useful for railroad modeling since it features a large, empty space under a transparent glass cover. An average person would keep a set of remote controls over there, but a miniature world enthusiast could use this opportunity for something much more interesting...
There's a large drawer inside which goes all the way out. With some modification it could become a base for a train layout. I've definitely seen a solution like this somewhere on the Internet. It would be very convenient, as I would be able to take the entire thing out to perform any needed work on it.
The other option I can see is removing the drawer for good and starting the build directly on the surface that normally supports the drawer. The top glass cover is not fixed and can be raised without a problem if you use the proper tools. Actually, I have bought those already :)
The former solution makes the actual work much more convenient. But the latter one has an advantage, too. The drawer is only 6cm deep and that would make it very difficult to even add a tunnel there. Without a drawer however, I could have structures taller than 9cm in some places. And that prospect is very tempting...
No matter which option I choose, my brand new castle model will not fit inside anyway... Sigh...
Obviously a layout inside a coffee table can't be huge. My first idea is to go for two independent loops with a small bridge and two tunnels. Some side tracks would fit there too, possibly with a locomotive shed.
Here's a computer visualization of the plan...
The first fittings are already under way. I will be using Kato Unitrack, since it's just so convenient. Looks like I'm opting for solution #2, but I have not really decided, yet.
Have you had a chance to see the latest Piko 2018 G-scale catalogue? Have you noticed anything interesting? A locomotive that has been there for years - Class 1116 "Taurus" - is missing. There will be no new model this year, and in the future... who knows. It might be renewed or not...
I was planning to buy this specific electric engine in G-scale for some time now. I was hoping that Piko would release a version in a livery that would be attractive to me. So each January I would download the new catalogue to see what was coming that year. And of course this year it was a huge surprise when I realized there was nothing new to wait for...
There was only one thing I could do in such case - immediately buy the model I liked most. That's how I became an owner of Piko 37428 - an ÖBB version of the Taurus locomotive. I got it from Ebay for way less than 200 Eur.
It's not a mistake the first photo in this blog post features a small description tag and not the entire product box. Turns out the front image does not really reflect the actual item inside. Piko seems to be re-using one packaging for various designs.
Opening the box reveals a heavy duty polystyrene casing. The locomotive - additionally wrapped in a transparent film - is perfectly safe inside.
There's a set of documentation included with the product. Lots of valuable information there...
...including full disassembly instructions. That's one thing I will be needing for sure very soon!
There's nothing more included. I somehow expected a pair of LGB-style middle buffers to be part of the set, but they're not. I do not really care that much, since I do not do narrow gauge at all, but it might matter to some people.
Let's take a closer look at the model.
Well, it looks great! The model is exactly what I expected. It offers enough details to deliver an attractive look, but it does not really feature any extremely fragile parts. This means I don't need to worry about accidental damage too much. The paint job is perfect. The labels are all very crisp and the base red color looks... expensive - almost like a Ferrari.
The top of the model features very nice looking pantographs. They make an impression of being made of metal but I'm pretty sure this is just carefully painted plastic. They include a spring mechanism that allows the user to open and close them easily.
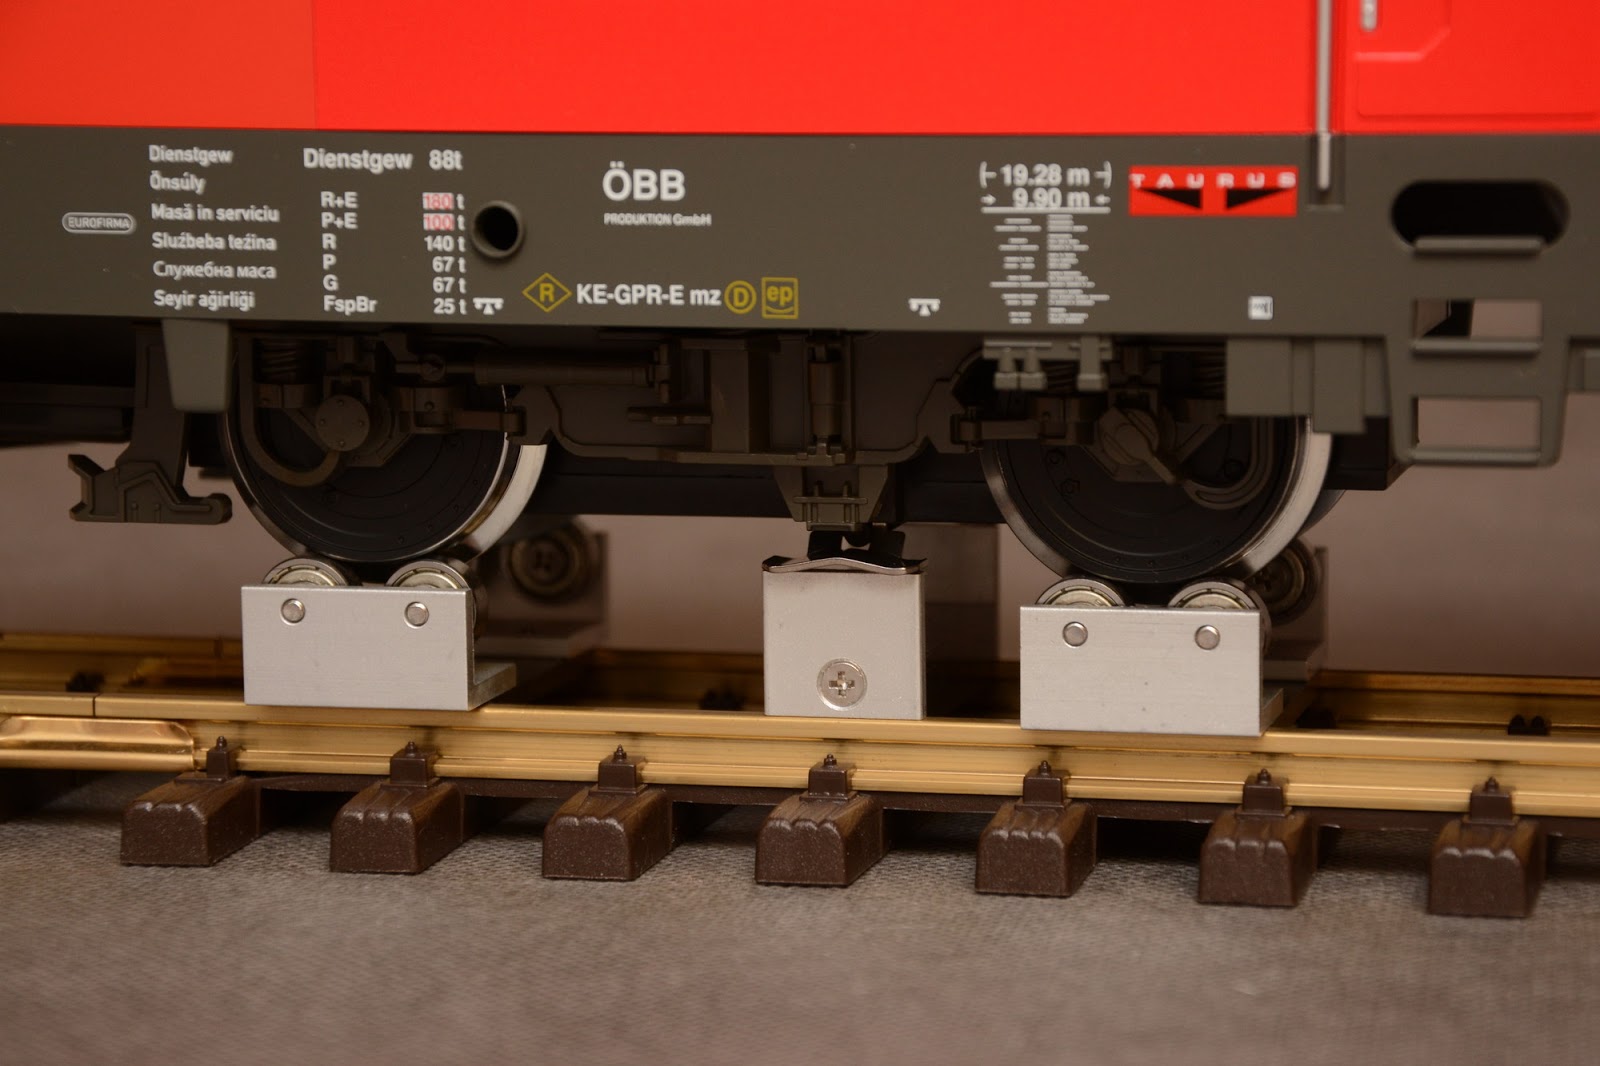
The bottom of the locomotive confirms the model is indeed ready for decoder and sound module installation. The middle of the underframe features an easily recognizable speaker chamber. This is going to be loud :)
There are however two aspects I'm disappointed about:
The product does not include any train engineer. The cab is empty. This forces me to buy and install some kind of Mr. Piko separately. Not a big deal assuming there's enough space inside.
The product does not include any rear red lights. It only features front white headlights. I was convinced the red markers would be there, since my similar N-scale model has them. It had to be easier to include those in a G-scale piece, right? So why aren't they there?
Anyway, the white headlights are strong and make a very good impression. Here's a photo taken in partial darkness.
I like the model a lot. I can't run it in the garden at the moment but I will definitely upgrade it to DCC before the spring, and make it ready for season 2018. I really wish it was in Polish State Railways "Husarz" livery but ÖBB is very nice, too. And with enough motivation I could always repaint it myself - just like they've done it for the amazing Kolejkowo layout.
Converting Tomix cleaning car to DCC control is not really a big deal. A lot of people have done it, and many of them have shown their results on the Internet. I'm joining the club now. My conversion was a success and I'm happy to tell the full story!
I have presented and reviewed my Tomix 6425 model around two months ago. I knew already back then I would be converting it to DCC. So my next step was finding a fitting decoder and placing an order. As soon as I had it, I could start the work.
The decoder I picked was ESU LokPilot Nano. I do not know of anyone else using this particular product with the Tomix cleaning car, and the main reason I went for this choice was its size. LokPilot Nano is supposed to be the smallest DCC decoder available on the market.
It is indeed tiny and measures roughly 7 x 8 mm. There's just no way it won't fit.
The decoder comes with attached cables and a small PCB connector at the end. That is much more than I need and I will be reducing the provided wiring.
I only need six cables:
track signal input (2 wires)
motor output (2 wires)
strobe light output (2 wires)
I used a prototyping board to test the decoder's behavior before installing it inside the car. Being a pessimist I was expecting some sort of a challenge here but no - everything worked right away!
I also took the opportunity and inspected the voltages on the input and on the motor output of the decoder. I was always curious what those looked liked. So here they are. This is the DCC signal straight out of my Roco z21 system as seen on my oscilloscope.
And below is the motor output. Personally I think that is very interesting. There are reports all over the Internet of the Tomix cleaning car dying very quickly on DCC layouts. Looking at the difference between the pre and post decoder signal plots, it is really not a surprise. The characteristics of those two are completely different and the DCC voltage is actually higher. No wonder it could destroy an unprepared engine.
It's time to start the installation. Opening the car required one screw to be removed. The screw appeared to be holding just one of the bogies but in fact it was keeping the entire model together. Once the wheel-set was loose, the top cover also fell off.
There's an empty area in the metal ballast part. Everyone put their decoders there. The LokPilot Nano electronics fit inside this spot very easily. I was even able to add a layer of an insulation tape on the weight's surface and there was still a lot of space left.
There were several ways I could go about the electrical connections. I decided to re-use the existing PCB part and removed all the elements from its surface. Now I had just an empty board.
I also used a hobby multi-tool to create a gap in the PCB. This should allow me to pass the wires from the decoder without any hassle.
The required cabling was soldered to the board. 2 wires will pick up the voltage from the track and 2 other wires will deliver the power to the motor.
The remaining 2 wires are decoder's AUX output. I'm going to assign those to function F1 and use them to drive an orange strobe LED. This will create a "warning light" informing of the cleaning car's operation on the track.
Alright, time to close the model. It looks perfect in the photo below and I'm happy with the outcome BUT it is a completely different story on the inside. I did a stupid mistake and because of that sealing the car was a huge pain. I'm not going to go into details but my advice is - always check everything not just 2 times, but 10 times or more before you CUT anything.
I obviously need to add something around the strobe LED to fill the gap. I will be probably 3D printing a small ring element.
OK, so here's a demo. It actually works!
Two more cents about the DCC configuration. I had a strong feeling the cleaning engine was getting too much power at a full DCC throttle. It sounded as if it was going to fly away. I was afraid it would get damaged so I decided to reduce its maximum power.
On the LokPilot Nano decoder this can be achieved by modifying CV5. This register controls the top motor speed and offers a range of values from 0 to 64. After some experimenting I configured my unit to use the value of 13 as the maximum. This way the disc rotates very fast (definitely fast enough for the cleaning operation) and the produced motor noise still sounds "healthy" to me.
Full success. I can now use my Tomix car without switching between the DC and DCC controllers.
I have to admit I wasn't running my G-scale trains as often as I wanted to during the last season. Reasons aside, one of the consequences was a dirty track which caused some of the rides not to be as smooth as desired. I can't say I liked it at all...
This was easily visible with the small Piko BR80 locomotive. The model does not offer that many points of contact with the rails and is not very heavy, either. At one point in time I became actually worried about its jumpy performance but a test run on a brand new track proved the engine was fine. The problem was just the dirty garden layout...
What could I do about it? Could I somehow add a capacitor just like I did in the case of my flicker-free lights? Perhaps that capacitor could be very cheap, too?
I opened the Piko 36121 decoder manual and to my surprise I found a chapter describing exactly what I wanted to achieve. The designers of the electronics have foreseen the issue and gave us an option to mitigate it.
The manual mentions Massoth Powercap product which offers a huge energy buffer that allows the locomotive to free-run for several seconds. There are Youtube videos showing that this solution works extremely well. There are however two issues with the Massoth product:
Its buffer is too big. I do not want my locomotive to keep going half a loop after I cut the power. I want it to stop quickly. What I want is just to avoid the issue of a dirty track. So an energy cell providing just 1 second of electricity should be enough.
The price. Powercap is listed between 40 and 60 Euro depending on the version. That's too much for my taste...
I wanted to try something less expensive. I knew it wouldn't be as good as the Massoth product but my expectations were much lower, too. And so I bought a cheap electrolytic element. It's rated 25V and offers the capacity of 10000uF. There are bigger types available on the market, but this was the only one I could get quickly and cheaply. One piece is around 1 Euro.
I disassembled the locomotive looking for a place to install the new element. Turns out there's a plenty of room in the front of the boiler. Since this was an experiment and I might have wanted to change my mind later, I decided to go for a solution that would not force me to open the model again anytime soon. So instead of simply installing the capacitor, I've exposed two cables in the front part of the locomotive.
One cable is connected to the decoder "plus pin" - the same that many other modules use. The other extends the "GND pin" - one that was not yet used in my setup. I can now decide to run with or without the capacitor just by opening the front of the boiler. And I can even upgrade easily to a larger element if this turns out to be a good idea!
So... how did the test run go? Well, first of all - the locomotive still works. Nothing exploded. I followed the simple instructions in the manual and managed to do the installation correctly.
I'm not really able to fully test the solution right now, since it's winter and I don't enjoy my garden that much at the moment. Besides it would be difficult to perform a scientifically correct test, as the conditions would be changing all the time. So instead I've recorded a video and analyzed the locomotive's behavior frame by frame with and without the capacitor. Here's my movie:
The results:
Without any power buffer the locomotive stops almost immediately after the power is cut. Any extra movement is noticeable on only 1 additional video frame which corresponds to a time of 40ms.
With the power buffer of 10000uF the locomotive continues its motion for a short time after the disconnection. Some movement can be recognized on additional 4 video frames which corresponds to a time of 160ms.
As you can see the capacitor does improve the performance. It provides some amount of energy that allows the locomotive to run a little longer after the track power is lost. The buffer is small, possibly too small to make a real-life difference. But it works in principle and extending the capacity is definitely possible.
For example - one could buy a larger capacitor. A 22000uF piece is just 2 Euro. Or one could buy more than one capacitor - their buffers will simply add up. The limit is just the space inside the model and it seems there is still some available.
Alright, I consider this experiment a success. The capacitor definitely stays inside my engine. It does something good, it's just difficult to say whether it's good enough. I will continue in spring when I put my BR80 on the dirty track again :)