During my "adventures" with the
Brawa locomotive it has been suggested to me that my N-scale layout track was dirty. Of course it was not but I've come up with a plan to do something about this potential issue anyway. I've decided to purchase a cleaning car which I was considering for some time now. It's manufactured by a Japanese company called Tomix and it's available in various versions. My model is blue and its catalog number is 6425.
It's not just a cleaning car but an entire system. The set comes with various cleaning discs: vacuum type, soft/wet type and sharp/dry type. The discs are interchangeable and only one is installed under the car at a time. By attaching a specific disc type, the user chooses the actual cleaning mode.
The other interesting element of the set is a bag containing four small parts. Those tiny pieces include:
- a brush attachment for brooming the tracks
- a sponge attachment for applying the cleaning fluid
- a disc changing tool
- a nozzle which does not fit anywhere :)
I've also ordered some extra accessories that work with the car.
Tomix 6423 is a set of additional cleaning discs with cleaning pads. Tomix 6424 contains extra cleaning pads only (without discs). And Tomix 6402 is a track cleaning fluid.
But let's go back to the cleaning car. It comes with a short but nice manual featuring a lot of pictures. Unfortunately the delivered version is available in Japanese only. German and English versions can be found on-line, since the Tomix car is also sold by Faller and Atlas.
The manual lists the three modes of cleaning the model offers:
- vacuum cleaning - where small particles of dust are being sucked away without touching the track
- wet cleaning - using the special fluid and a rotating soft pad to gently wipe the rail track
- dry cleaning - which uses a sandpaper-like pad to remove the most problematic dirt
This is what the model looks like. A little bit futuristic, isn't it?
One end of the car features an On/Off switch as well as a tank for the cleaning juice.
The other end offers an optional power socket. The car will normally pick up the current from the track, but if it is really dirty... maybe that socket becomes useful?
The center of the car is just an empty container that gets filled with the dirt collected in the vacuum cleaning mode.
A look under the car reveals a thin rod the discs get attached to. The rod is an extension of a small engine that is hidden inside the model. The motor makes the cleaning discs spin around during the cleaning process.
A very important information about the cleaning car is that it is not
motorized. Its internal engine is used only for the cleaning process, and does not make the model move. So you either have to pull it with a locomotive, or push it with your finger.
I know from the Internet that the car is not really DCC-compatible. In particular the motor tends to burn out easily in digital setups, most probably due to the input voltage being too high. The manual clearly states 12V DC requirement. That's a bummer, since even my Trix analog control set can deliver more than that. I guess, I will have to be careful...
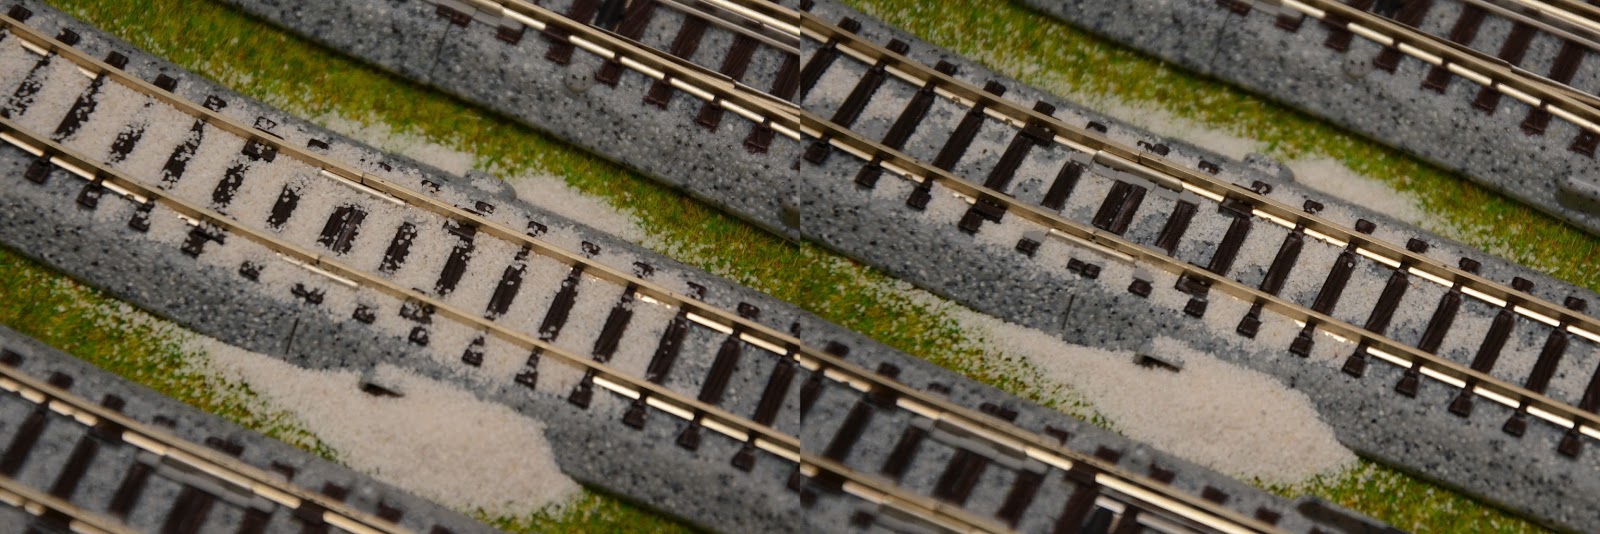
Test #1 - vacuum cleaning mode. My layout was not really dirty, so I just spilled some fine ballast over the track. The left photo shows the area before the cleaning, and the right photo shows the same place after. The vacuum cleaning clearly worked and the car was able to suck in even relatively heavy ballast particles. I'm pretty sure it would pick up regular dust very easily.
The material ended up in the chamber inside the car.
During another run it even picked up a pretty large piece of a paper towel.
Test #2 - wet cleaning mode. Again the left and the right pictures show the same piece of track before and after the procedure. Not much difference there, right? Like I said - my layout was never really dirty :)
The results of cleaning were however noticeable. I've exercised the least used piece of my layout for the test and in the beginning the car did have obvious issues getting the power from the track. After a few runs, it started working perfectly, so the rails got cleaner, even though it's difficult to see it in the pictures.
And of course there's another proof. The cleaning pad definitely gathered some dirt which can be seen in the photo below.
Test #3 - dry cleaning mode. Now the comparison photos do show some difference indeed. The sandpaper discs really touched the track. Unfortunately it does not really look good at all. The rails are clearly "skinned" and the result is something I would call a damage.
Just to be clear - my test was a rather lengthy one. So if you take a look at the disc after I applied it to the track, you will see it has been worn out. Maybe if I ran it just a single time, the effects would be less scary...
But on the other hand, I did find places on my layout where the disc spun for just a short moment. And yes, I would still call that a damage. The scratches are well visible in the photo below.
I have two extra observations after my testing...
First - in the modes where the pads actually touch the track, the model has some issues passing over switches and re-railers. And it also introduces a significant drag. Therefore the usage of the cleaning car will always require some extra attention from the operator. It needs just the right amount of pulling power, so that it does not get stuck on the obstacles but does not derail, either.
Second - the voltage required to run the engine is not just 12V. It's variable depending on what the car is doing at the moment. That discovery affects my thinking about making the model DCC-compatible. I thought I could just add some simple circuitry to convert the DCC voltage to a constant 10-12V DC. This will not be the case. I can see now I need to retain control over the cleaning motor's power. So a DCC decoder installation is a must.
Summary
Well, the model definitely works and can be used for keeping an N-scale track clean. I think the vacuum cleaning mode is somehow useful. The wet cleaning seems like the best choice for frequent use. And the dry cleaning is a dangerous mode I will never use again.
The cheapest method to buy the model is to get it directly from Japan. I strongly suggest going to the
Japan Plaza Ebay store for a really good price. I've been shopping there for quite some time now and have always had a very good experience...
My next step? DCC decoder installation inside the cleaning car. Hopefully coming very soon...