Recent Posts

Friday 22 December 2017

Adding passengers to my Kato N-scale tram

When I purchased my Kato Portram model, I've bought some N-scale passenger figures along with it. That was over two years ago. It's really about time I installed those :)

Kato n-scale tram and figures

The passengers figures I will be using came in two kits:
  • Kato 24-205 containing sitting people
  • Kato 24-274 containing various railroad staff members

kato passengers and train engineers sets

The tram model manual features really nice disassembly instructions. Obviously it's all in Japanese. But there are also some good pictures to guide us, and the whole process is not really that complicated.


The manual seems to promote the usage of toothpicks for opening the chassis. That's an interesting coincidence - I always use the toothpicks, too!

kato portram disassembly

The upper part of the tram consists of two independent elements. Those are however connected at the top and you have to remove both in a single step. Otherwise the fragile joint between the two will be broken.


A big surprise! The lower part of the tram is completely flat and does not feature any real "leg space". The miniature people will not fit there at all..


I have no choice but to remove the legs from every single figure that I intend to use. They look really bad after this operation...

n scale figure legs removal

...but as soon as they are glued to the chassis, their appearance improves a lot. Maybe this was a good idea after all!


Some minutes later my tram is full of passengers. They do look funny without their legs but I double checked it, and yes - they're at the correct height here.


The end result? Pretty good! The engineer really adds to the look of the tram.

kato portram lit with engineer installed

Due to the partially covered windows, the other passengers are not very prominent...


...but the difference between an empty car and my upgraded model is very clear.


I love the outcome. This tram feels much more alive now!

Monday 4 December 2017

My failure with Metcalfe N-scale paper kits

Building models made of card stock or cardboard is very popular. People create amazing things using these simple materials. I've decided to try it myself, too, but since I have no interest in ships or tanks, I started looking for something for my N-scale layout.

Metcalfe is a very well recognized manufacturer of paper kits for train layouts. Their offer covers a wide selection of structures in different scales. These products are not expensive, so I've picked two different pieces at once when placing my order online: PN113 engine shed and PN821 wooden house.

Metcalfe N-scale paper kits

I've also bought the UHU glue recommended by Metcalfe as well as a set of applicator bottles. Those are supposed to offer an "ultra fine tip" and help when using the adhesive on small elements.


The engine shed set contains quite a lot of parts. Most of those are thick paper but we also get windows made of transparent plastic sheet.

PN113

The manual is 8 pages long and covers the construction process step by step. It's very clear that a different approach was taken here compared to - for example - Faller products. The documentation features a lot of text but the parts are not tagged almost at all. It actually resembles more a set of notes taken by your buddy than an official guide.


The wooden pavilion kit is much smaller. It's just one sheet of a card stock, a small sheet of laser cut cardboard and a piece of a plastic film.

PN821

The manual is shorter, too. We get just a few small pages containing directions. An interesting aspect of the document is that it features sections that need to be cut out and glued to the structure. So the guide becomes part of the model, too.


Alright, time for some work. I somehow assumed the bigger building would be easier to assemble, and so I started with the engine shed. The first steps seemed easy even though the manual proved not to be very detailed. In particular it does not describe every single part we need to use, so a little bit of imagination is needed. It's not a big issue however, since the model is not really that complicated.


On my third evening of work the building started looking interesting. I have to say I'm impressed by how the model is designed. Each wall consists of several layers which creates a very nice depth effect. The elements are nicely printed with a lot of small details.

The glue applicators proved very useful, too. They worked great and definitely made the assembly process much, much easier.


Unfortunately I've encountered also some serious challenges. Several of the walls needed to be folded 180 degrees and glued back to back. This seemed easy at first, but it turned out the bond was not strong enough to hold the parts together.

My walls came apart. I simply glued them back. Then the problem occurred again, and I fixed it one more time using clips and waiting for the model to dry overnight. All seemed fine and then... three days later... it fell apart one more time...

Cardboard structure failure

I have to admit - for me this was not fun anymore. And I've decided not to pursue the idea of paper models any further. Yes, I gave up :(

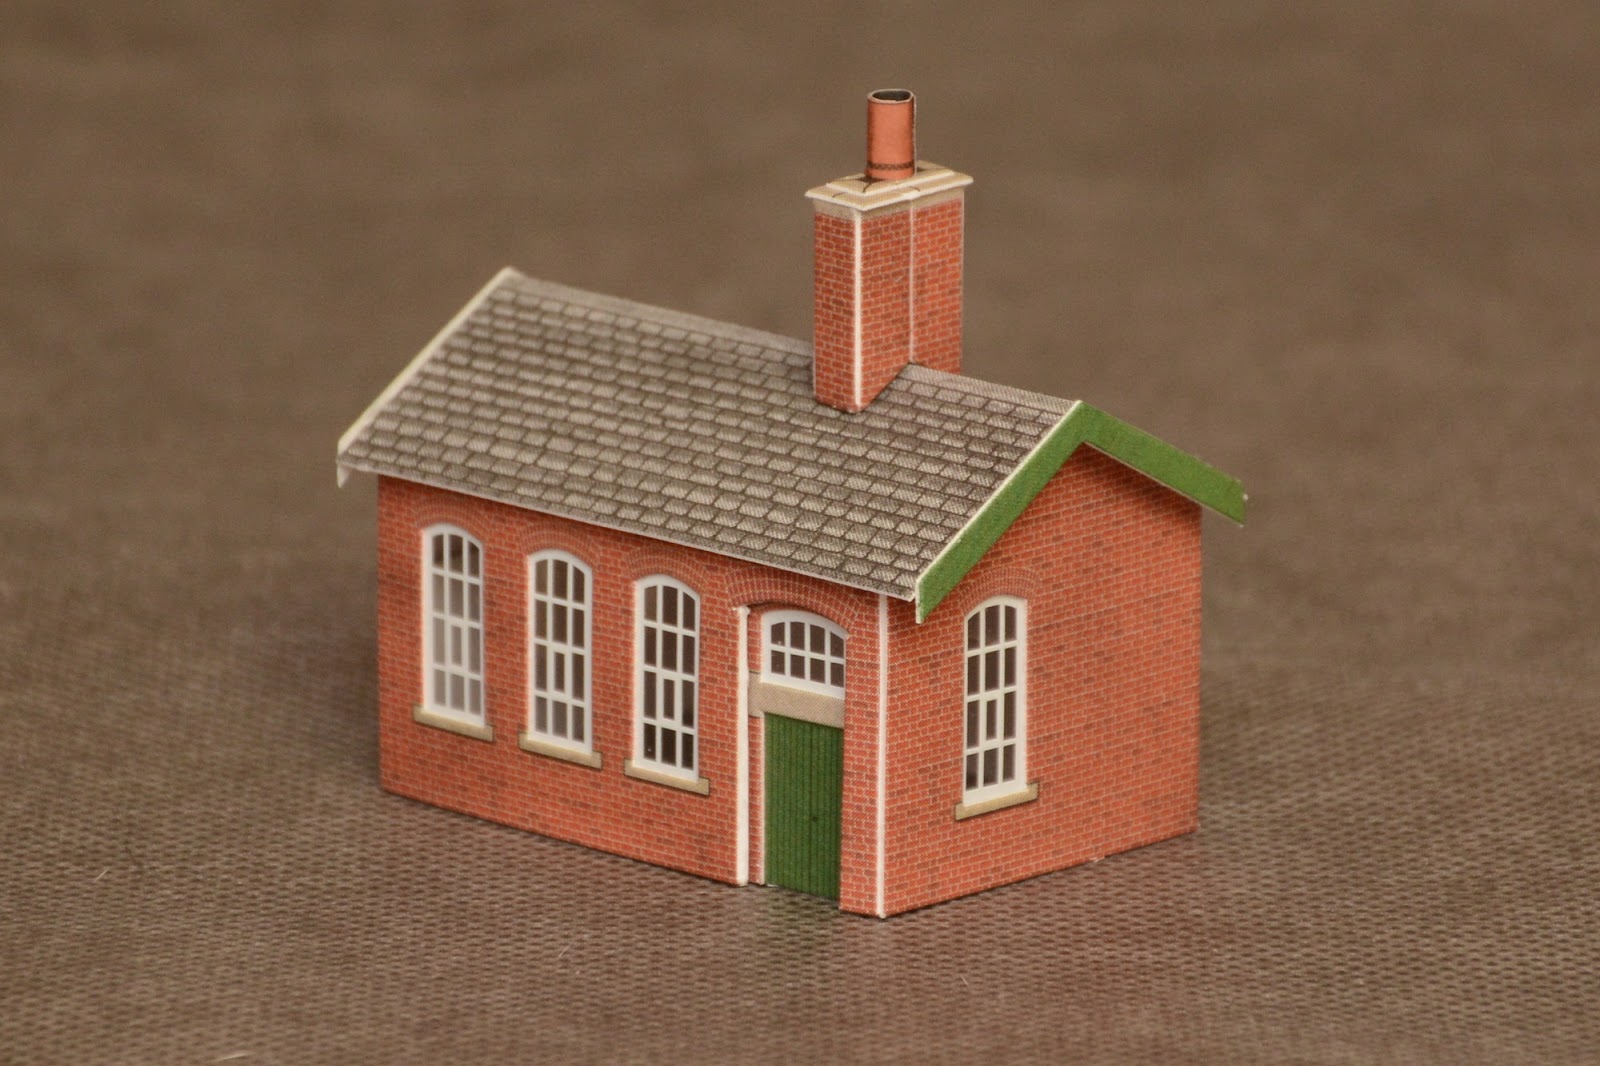
The only structure I've managed to finish was the small office building. This one did not feature any back to back folding and the glue held very well in this case. Here's the final outcome.

N-scale office building

Personally I think the house looks great considering it's made of paper. It does not feel flat at all, since the walls are multi-layered. It features a lot of details, that are simply printed on the card stock pieces. Except for not being perfectly rectangular, it does not look worse than plastic models. In fact - considering the facades which expose every single brick (and in different shades of red, too) it does look even better.

Well, paper models are not for me. My first attempt at building those is a clear failure. Plastic pieces and a glue that dissolves the material is what I enjoy. But it does not mean the Metcalfe products are bad. Actually, I'm convinced the opposite is true. The kits are very well designed and made. I'd recommend them to anyone who feels confident about working with paper.

Sunday 26 November 2017

Faller 170900, Tunnel entrance using natural stone set

Work on the tunnel for my garden layout is progressing very slowly. After my first failure with wood I have decided to change to a lightweight concrete structure which seems to be holding well for now (see here). The time has come to work on the appearance and the next logical step for me was the creation of a nice tunnel entrance.

That's something I have not done before, so I was not sure where to start. Luckily I came across a Faller product which seemed to be exactly what I needed. Faller 170900 is a natural stone set for outdoor application. Let's give it a try!

Faller 170900 natural stone set

The kit consists of several elements:
  • a can of glue for outdoor application
  • a bottle of surface sealing
  • a bottle of impregnation
  • six stone mats
  • a brush
  • a wood seam
  • a user's guide


Content of the provided manual proves very useful. It allows an easy start even for people who use this kind of materials for the very first time. Reading it was a valuable lesson for me.


The stone mats come in two colors: light and dark. Three pieces of each are included. A single mat is 210 x 148 mm large.

Faller natural stone mats

OK, let's start the actual work on the tunnel entrance. Like many of my projects, this one also starts with an old pizza box. I used it to decide the shape of the entrance I wanted to build.


Once I was happy with the dimensions and the curves, I copied the pattern onto the two pieces of an insulation foam. This material is meant for covering the facades of real buildings, so it should do well outdoors...


Next I started cutting the shapes of the stones out of the provided mats. It was very easy to do just by using my hobby knife.


Once glued to the foam, they immediately started looking like a tunnel entrance. The result was nice right away. Unfortunately the glue turned out to be a solvent for the foam and damaged the surface significantly. But it did not really matter in the end.


Of course the outcome was not perfect. In particular - had I read the manual more carefully, I would have avoided the vertical gaps visible in the photo below. Still - the defects are barely visible from a distance.


I cut the remaining stone mats into rectangles and divided them into two groups, one for each entrance piece. That's when I realized I did not have enough material to cover the entire surface...


I had two choices at this point - either buy more mats, or improvise. I chose the latter and decided to go for an aged look. So my tunnel entrance will have only some of its rocks visible.


The rest will be covered with colorful ballast I normally use on my N scale layout. First I glued it to the foam and then secured it with the Faller surface sealing.


The last step was impregnation which I repeated three times. Faller 170903 included with the set was used for this. Here's the final result. Entrance #1...

g scale tunnel entrance finished

...and entrance #2.


I was afraid the small ballast particles would not hold well. It seems however that spraying the sealing substance several times did the trick. Nothing fell off and I did not even have to clean the work area very much after I was done.

I'm pretty satisfied with the outcome. Not bad for a first try. If the whole thing holds well over time I'll be very, very happy. Faller 170900 is definitely a very good product that can help achieve great results easily. There's not a single thing here I could complain about...

The installation will have to wait until spring. But I can already see it's going to look great on my layout :)

Tuesday 14 November 2017

Piko 37738 & 37739, G-Scale gondola cars

It's hard to believe how lucky I sometimes am when it comes to my purchases. When I first saw a Polish State Railway G-scale freight car in Piko's 2013 catalog, I knew I had to have it. But the price was a little too much for me. So I waited for some good promotion but... it never came. Instead the model was sold out and became almost unobtainable.

Months and months have passed since that time. I've decided to give this dream another go. So I typed the proper search keywords into Google and I started browsing the results of my query. Page after page I've reached an area of Internet where no man has gone before. And then... I found it. My Polish State Railway gondola car not only was available but it was discounted as well!

So instead of one model, I bought two. Two for a price of one. Piko 37738 & Piko 37739.

Piko G scale gondolas

The products come in the usual Piko packaging. Despite having spent a long time on the store shelves, they look perfect. I'm happy already!

Piko 37738 & Piko 37739

The cars are identical, except for the paint job. And the content of the boxes is almost the same, too.


The only difference is in the amount of yellow anchors provided with the sets. One model comes with four pieces, and the other one with six. It's interesting but not really important, since there are only four slots for those anyway.


Ten minutes later the extra parts are installed. They're a tight fit, so I was forced to use a hammer with a rubber head. But here it is. This is what Piko 37739 looks like:

Piko 37739

And here's Piko 37738:

Piko 37738

Below you'll find even more photos of both cars next to each other.

Piko PKP G scale gondola

The models are "nothing special", they're just regular gondola cars after all. There's however nothing bad about them, either. They provide a decent amount of details, they're nicely painted and they're exactly what I expected them to be.

I'm of course very happy to finally own a Polish railway model in G-scale. Those are very rare and I was really lucky to get one. I still think the original price was too high, so I'm extremely pleased I was able to find them significantly discounted. Another good deal on my side :)