Recent Posts

Showing posts with label scenery. Show all posts

Tuesday, 3 July 2018

3D printed G-scale helipad with Arduino

My recently completed Bell UH-1 Huey helicopter was meant for the garden layout display right from the start. As I was thinking about a good area to place it, I came up with an idea of building a real helipad just for that purpose. But can you buy a G-scale heliport model? You probably can't. But you can always build or... 3D print one!

The shape of a helipad is not really that complex. It's just a round stand after all. The design of a 3D model didn't take long to complete and very soon I was printing the main part.

3d printing

I wanted to make my helipad somehow special. And I also wanted to finally try the Arduino boards I had lying around for quite some time. Flashing positional lights is what I came up with. I quickly wired the Arduino with six blue LEDs and made them blink.

arduino with blinking leds

The connections are very easy. I simply used one output port of the board per each single LED. This way I do not need any power relays and the entire setup consists of only:
  • Arduino Nano
  • Six blue LEDs
  • Six 1kOhm resistors
  • 8V power supply
The program to manage the LEDs is not complex either. Actually it's so short that I can easily share it here. This is the complete Arduino code:

int LED_1_1 = 2;
int LED_1_2 = 3;
int LED_1_3 = 4;
int LED_2_1 = 5;
int LED_2_2 = 6;
int LED_2_3 = 7;

void setup() {
  pinMode(LED_1_1, OUTPUT);
  pinMode(LED_1_2, OUTPUT);
  pinMode(LED_1_3, OUTPUT);
  pinMode(LED_2_1, OUTPUT);
  pinMode(LED_2_2, OUTPUT);
  pinMode(LED_2_3, OUTPUT);
 
  digitalWrite(LED_1_1, LOW);
  digitalWrite(LED_1_2, LOW);
  digitalWrite(LED_1_3, LOW);
  digitalWrite(LED_2_1, LOW);
  digitalWrite(LED_2_2, LOW);
  digitalWrite(LED_2_3, LOW); 
}

void loop() {
  digitalWrite(LED_1_1, HIGH);
  digitalWrite(LED_1_2, HIGH);
  digitalWrite(LED_1_3, HIGH);
  delay(150);
  digitalWrite(LED_1_1, LOW);
  digitalWrite(LED_1_2, LOW);
  digitalWrite(LED_1_3, LOW);
  delay(150);
  digitalWrite(LED_1_1, HIGH);
  digitalWrite(LED_1_2, HIGH);
  digitalWrite(LED_1_3, HIGH);
  delay(150);
  digitalWrite(LED_1_1, LOW);
  digitalWrite(LED_1_2, LOW);
  digitalWrite(LED_1_3, LOW);
  delay(300);
  digitalWrite(LED_2_1, HIGH);
  digitalWrite(LED_2_2, HIGH);
  digitalWrite(LED_2_3, HIGH); 
  delay(150);
  digitalWrite(LED_2_1, LOW);
  digitalWrite(LED_2_2, LOW);
  digitalWrite(LED_2_3, LOW);
  delay(150);
  digitalWrite(LED_2_1, HIGH);
  digitalWrite(LED_2_2, HIGH);
  digitalWrite(LED_2_3, HIGH); 
  delay(150);
  digitalWrite(LED_2_1, LOW);
  digitalWrite(LED_2_2, LOW);
  digitalWrite(LED_2_3, LOW);
  delay(300);
}

I have installed the LEDs on the top of the helipad base. With small holes in the surface created with a hot needle I pushed the pins through.


The Arduino board and the wiring are hidden inside. I only hope this setup can survive outdoor conditions...


I have also 3D printed a bottom part which will seal the model and provide some level of weather resistance.


There are two extra elements I have printed in 3D:
  • a white, flat H letter
  • six transparent caps to protect the LEDs
Those were just glued to the base with a regular plastic cement.


Once powered up, it is blinking indeed!

g scale helipad

And then I thought - what if it breaks? And I quickly realized I needed a way to easily remove and install again the helipad on my layout. That's when I recalled I had an empty filament spool lying around.


The solution: my helipad will be attached non-permanently to a permanent base.


I have 3D printed a plastic anchor and glued it to the bottom of the helipad. The anchor fits the hole in the spool perfectly. I can now just stick the helipad into the base and it holds well enough. No glue needed, and it can be easily lifted whenever I need.


OK, but if the helipad is elevated - how do the people enter the helicopter? They obviously need some stairs. And so I 3D printed those, too. Actually they came up so nice, I have decided to share them online: https://www.thingiverse.com/thing:2909311

3d printed stairs

The helipad is installed. It does not look bad at all. The lights blink at night. The only thing still missing is the helicopter...

garden layout heliport

I need to find a way to attach my Huey securely to the pad without making any permanent modifications to the model and I'm all set!

Sunday, 20 May 2018

3D printed G-scale traffic signs

I love adding details to my garden layout. I have a long backlog of items which should - at some point - become part of my miniature world. But my time is of course limited, so I have to take it slowly, step by step...

I'm now in the process of adding traffic signs to my little town. This should make my roads much more life-like. The signs will definitely add colors and detail to the urban landscape. And of course they should decrease the number of road accidents my G-scale minions cause every day, too :)

g scale layout with a traffic sign

The idea started with the single railway sign visible below. The plastic plate and the post are just spare parts I had left from one of the building kits. I did not know what to do with them, so I printed a sticker and applied it to the element. I was very surprised to see, that this combination had proven to be very weather resistant. The model kept its good appearance even after staying outside for almost two years.


And so I decided to print some traffic signs. I used the same synthetic non-paper self-adhesive sheets as before. These are made by a Czech company called Rayfilm. They're not completely UV resistant and their colors fade when continuously exposed to the sun. But they can definitely survive rain, snow and a wide range of temperatures.

traffic sign stickers

In the next step I designed a collection of 3D models. That was very easy to do, since the traffic signs consist of cylinders, rectangles and triangles only. My previous experience with the Blender software allowed me to finish the work in just one evening.


My Anet 3D printer was used for production of the actual physical parts. Here's the very first sample I created. Since the model was simple, the printing process was a breeze.


The collection shown below took an entire day to manufacture. But that is actually all I need for my not-so-large layout.

3d printed road signs

Once I added the stickers, the signs turned beautiful right away. I fell in love with them at first sight.

g scale traffic signs

Now even the first-time G-scale visitors know very well they need to reduce the speed when entering the town limits. That is assuming they pay attention to the signs, and not to the sexy hitchhiker across the street.


In the spirit of sharing, I have released my models into the Thingiverse repository. Feel free to give them a try: https://www.thingiverse.com/thing:2909330. If you're missing any particular sign type, please do let me know, as I might be able to create an extra piece pretty easily.

Monday, 29 January 2018

A new N-scale layout inside a coffee table...

Definitely the thing I hate most in my life is visiting my dentist. But not very far behind is going shopping to the Ikea store. The maze of small rooms designed to force you to look at their entire offer and prohibiting you from focusing on the one thing you need is too much to me. I avoid this place as much as I can.

Turns out however, there are good things at Ikea after all. One of those could be the LIATORP coffee table.

ikea liatorp table

No, I did not go to Ikea to buy it. I got it as a Christmas gift. The intent behind this present was to allow me to build a new train layout. One that could be permanently displayed in our living room. I'm so glad the Santa Claus is really considering my needs :)

The LIATORP table can be useful for railroad modeling since it features a large, empty space under a transparent glass cover. An average person would keep a set of remote controls over there, but a miniature world enthusiast could use this opportunity for something much more interesting...

kato unitrack inside coffee table

There's a large drawer inside which goes all the way out. With some modification it could become a base for a train layout. I've definitely seen a solution like this somewhere on the Internet. It would be very convenient, as I would be able to take the entire thing out to perform any needed work on it.


The other option I can see is removing the drawer for good and starting the build directly on the surface that normally supports the drawer. The top glass cover is not fixed and can be raised without a problem if you use the proper tools. Actually, I have bought those already :)


The former solution makes the actual work much more convenient. But the latter one has an advantage, too. The drawer is only 6cm deep and that would make it very difficult to even add a tunnel there. Without a drawer however, I could have structures taller than 9cm in some places. And that prospect is very tempting...

No matter which option I choose, my brand new castle model will not fit inside anyway... Sigh...


Obviously a layout inside a coffee table can't be huge. My first idea is to go for two independent loops with a small bridge and two tunnels. Some side tracks would fit there too, possibly with a locomotive shed.


Here's a computer visualization of the plan...

visualization of coffee table train layout

The first fittings are already under way. I will be using Kato Unitrack, since it's just so convenient. Looks like I'm opting for solution #2, but I have not really decided, yet.

Monday, 4 December 2017

My failure with Metcalfe N-scale paper kits

Building models made of card stock or cardboard is very popular. People create amazing things using these simple materials. I've decided to try it myself, too, but since I have no interest in ships or tanks, I started looking for something for my N-scale layout.

Metcalfe is a very well recognized manufacturer of paper kits for train layouts. Their offer covers a wide selection of structures in different scales. These products are not expensive, so I've picked two different pieces at once when placing my order online: PN113 engine shed and PN821 wooden house.

Metcalfe N-scale paper kits

I've also bought the UHU glue recommended by Metcalfe as well as a set of applicator bottles. Those are supposed to offer an "ultra fine tip" and help when using the adhesive on small elements.


The engine shed set contains quite a lot of parts. Most of those are thick paper but we also get windows made of transparent plastic sheet.

PN113

The manual is 8 pages long and covers the construction process step by step. It's very clear that a different approach was taken here compared to - for example - Faller products. The documentation features a lot of text but the parts are not tagged almost at all. It actually resembles more a set of notes taken by your buddy than an official guide.


The wooden pavilion kit is much smaller. It's just one sheet of a card stock, a small sheet of laser cut cardboard and a piece of a plastic film.

PN821

The manual is shorter, too. We get just a few small pages containing directions. An interesting aspect of the document is that it features sections that need to be cut out and glued to the structure. So the guide becomes part of the model, too.


Alright, time for some work. I somehow assumed the bigger building would be easier to assemble, and so I started with the engine shed. The first steps seemed easy even though the manual proved not to be very detailed. In particular it does not describe every single part we need to use, so a little bit of imagination is needed. It's not a big issue however, since the model is not really that complicated.


On my third evening of work the building started looking interesting. I have to say I'm impressed by how the model is designed. Each wall consists of several layers which creates a very nice depth effect. The elements are nicely printed with a lot of small details.

The glue applicators proved very useful, too. They worked great and definitely made the assembly process much, much easier.


Unfortunately I've encountered also some serious challenges. Several of the walls needed to be folded 180 degrees and glued back to back. This seemed easy at first, but it turned out the bond was not strong enough to hold the parts together.

My walls came apart. I simply glued them back. Then the problem occurred again, and I fixed it one more time using clips and waiting for the model to dry overnight. All seemed fine and then... three days later... it fell apart one more time...

Cardboard structure failure

I have to admit - for me this was not fun anymore. And I've decided not to pursue the idea of paper models any further. Yes, I gave up :(

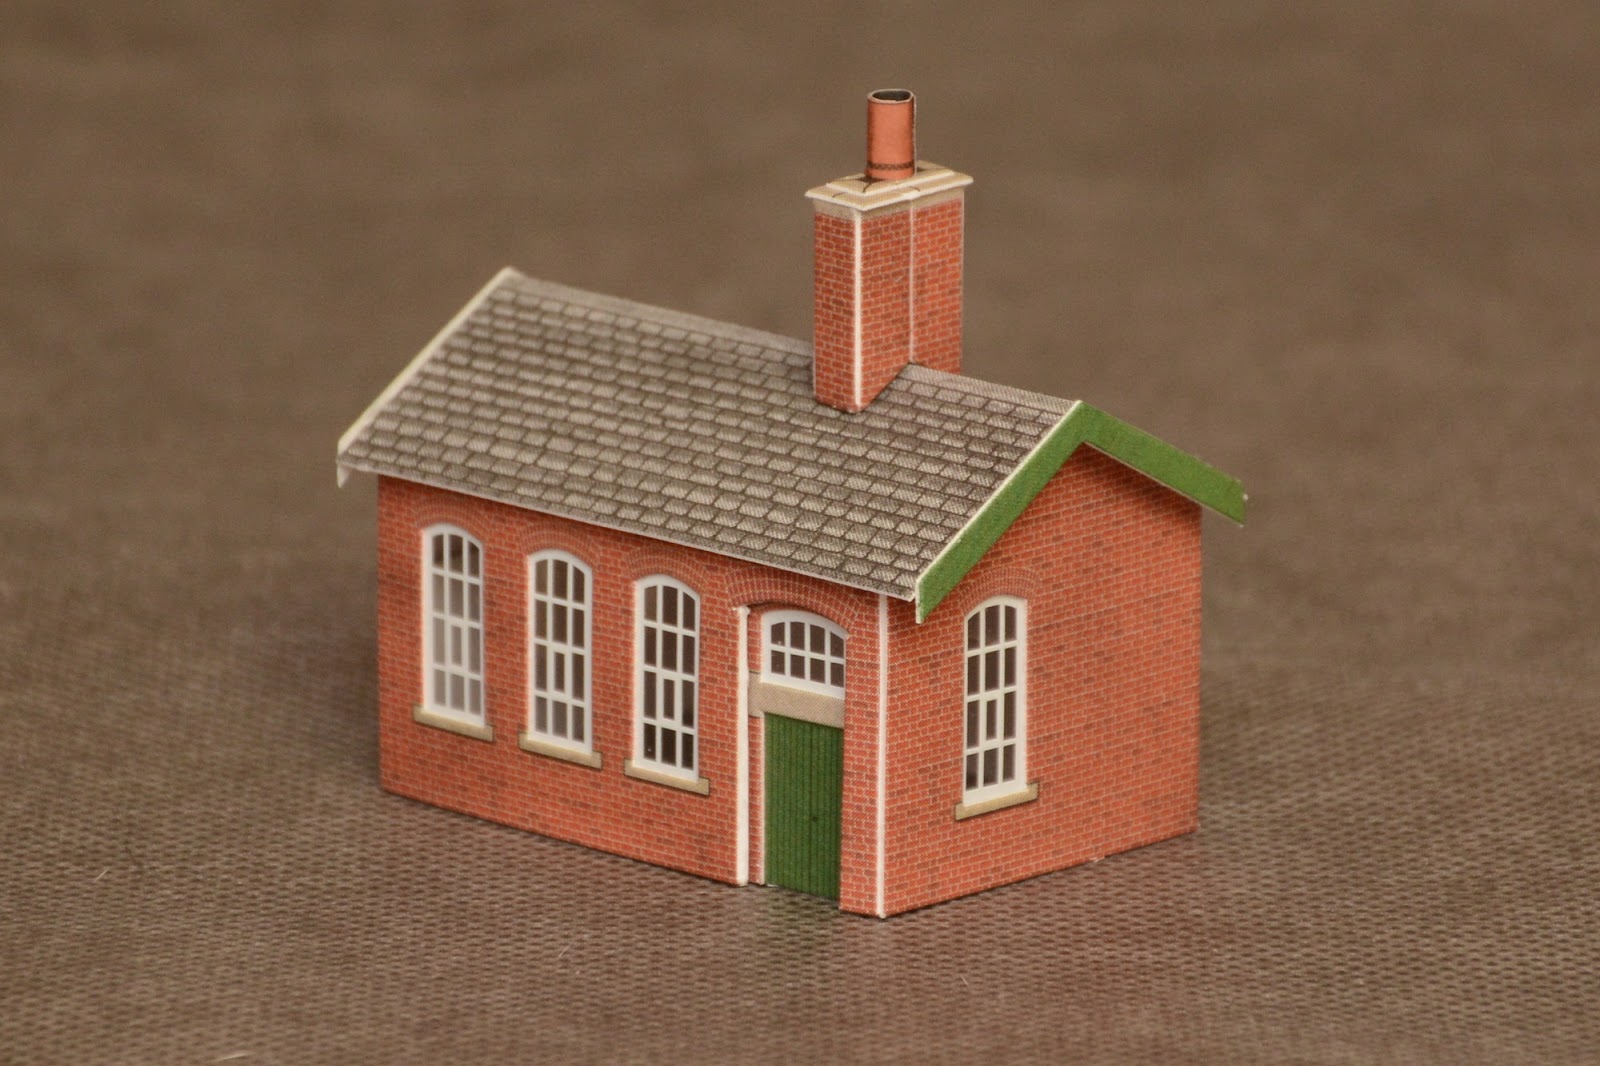
The only structure I've managed to finish was the small office building. This one did not feature any back to back folding and the glue held very well in this case. Here's the final outcome.

N-scale office building

Personally I think the house looks great considering it's made of paper. It does not feel flat at all, since the walls are multi-layered. It features a lot of details, that are simply printed on the card stock pieces. Except for not being perfectly rectangular, it does not look worse than plastic models. In fact - considering the facades which expose every single brick (and in different shades of red, too) it does look even better.

Well, paper models are not for me. My first attempt at building those is a clear failure. Plastic pieces and a glue that dissolves the material is what I enjoy. But it does not mean the Metcalfe products are bad. Actually, I'm convinced the opposite is true. The kits are very well designed and made. I'd recommend them to anyone who feels confident about working with paper.

Sunday, 26 November 2017

Faller 170900, Tunnel entrance using natural stone set

Work on the tunnel for my garden layout is progressing very slowly. After my first failure with wood I have decided to change to a lightweight concrete structure which seems to be holding well for now (see here). The time has come to work on the appearance and the next logical step for me was the creation of a nice tunnel entrance.

That's something I have not done before, so I was not sure where to start. Luckily I came across a Faller product which seemed to be exactly what I needed. Faller 170900 is a natural stone set for outdoor application. Let's give it a try!

Faller 170900 natural stone set

The kit consists of several elements:
  • a can of glue for outdoor application
  • a bottle of surface sealing
  • a bottle of impregnation
  • six stone mats
  • a brush
  • a wood seam
  • a user's guide


Content of the provided manual proves very useful. It allows an easy start even for people who use this kind of materials for the very first time. Reading it was a valuable lesson for me.


The stone mats come in two colors: light and dark. Three pieces of each are included. A single mat is 210 x 148 mm large.

Faller natural stone mats

OK, let's start the actual work on the tunnel entrance. Like many of my projects, this one also starts with an old pizza box. I used it to decide the shape of the entrance I wanted to build.


Once I was happy with the dimensions and the curves, I copied the pattern onto the two pieces of an insulation foam. This material is meant for covering the facades of real buildings, so it should do well outdoors...


Next I started cutting the shapes of the stones out of the provided mats. It was very easy to do just by using my hobby knife.


Once glued to the foam, they immediately started looking like a tunnel entrance. The result was nice right away. Unfortunately the glue turned out to be a solvent for the foam and damaged the surface significantly. But it did not really matter in the end.


Of course the outcome was not perfect. In particular - had I read the manual more carefully, I would have avoided the vertical gaps visible in the photo below. Still - the defects are barely visible from a distance.


I cut the remaining stone mats into rectangles and divided them into two groups, one for each entrance piece. That's when I realized I did not have enough material to cover the entire surface...


I had two choices at this point - either buy more mats, or improvise. I chose the latter and decided to go for an aged look. So my tunnel entrance will have only some of its rocks visible.


The rest will be covered with colorful ballast I normally use on my N scale layout. First I glued it to the foam and then secured it with the Faller surface sealing.


The last step was impregnation which I repeated three times. Faller 170903 included with the set was used for this. Here's the final result. Entrance #1...

g scale tunnel entrance finished

...and entrance #2.


I was afraid the small ballast particles would not hold well. It seems however that spraying the sealing substance several times did the trick. Nothing fell off and I did not even have to clean the work area very much after I was done.

I'm pretty satisfied with the outcome. Not bad for a first try. If the whole thing holds well over time I'll be very, very happy. Faller 170900 is definitely a very good product that can help achieve great results easily. There's not a single thing here I could complain about...

The installation will have to wait until spring. But I can already see it's going to look great on my layout :)