Recent Posts

Tuesday, 29 September 2015

Garden works, part 7: Elevated layout foundation

September is almost over. I have been very much focused on elevating my garden layout in the past few weeks. The work has been going slowly but the results are already well visible. This is what it looks like now:


As you can see I already have the foundation for my elevated layout: a large ditch filled with drainage stones and the first part of my layout frame. Starts looking nice :)

But let's take a look back and see how I got here...

The original idea (described here) was about building a modular wooden frame that would later be filled with dirt. This is what my design looked like:


Based on that plan I've built the first wooden module. As you can see I've decided to add some more cross-support. I was simply afraid the entire thing was not going to hold the pressure of the filling. More wood of course meant higher cost :(


The module was painted with a wood protector. And it was painted twice to get the colour requested by my wife. Painting more wood twice = higher cost :(


In the meantime I was preparing the place where the module would be later installed. This was going to be exactly in that corner of my garden.


I did not want the wood to rot too quickly, so I had to provide some drainage. I've decided to dig a large hole and fill it with stones. This is the same corner after four days of digging:


In the meantime I ordered the first batch of stones. And that's where another improvement comes into play. I was afraid that filling the frame with dirt would create a very moist environment that would quickly damage the wood. So I decided not to use the dirt at all. I'm going to be filling my frame with stones only. This of course increases the cost, too.

And that is what six tons of stones look like. I do not have a road access to my garden so I had to move it all with a wheelbarrow. It took six days...


Three weeks later the entire ditch was ready. It's around 25 m2 (~270 ft2) large and 25 cm (almost a foot) deep. The effort needed to dig it was huge. I've never ever done anything like this in my life before. It was so painful, it made me think about giving up more than once...


A side result of all this digging is a huge pile of dirt in my garden. Actually most of my garden is just one big mess now.


And removing all that dirt will again require using a wheelbarrow. I've ordered a debris container and I'm moving all the excess soil out of my garden. I'll need at least a week to finish that...


The effort is huge. It's a hard physical work I'm not really used to. The cost is also going up. But the entire project is starting to look good. And I'm thinking the worst part might be already behind me.

Will I finish it before the winter hits? Hard to say... For now I just wish I was a little less tired, so I could enjoy it a little bit more :)

Tuesday, 15 September 2015

Interior lighting tuning

In one of my previous posts I have described my method of adding interior lighting to a G scale passenger car. And since I own more than one, I wanted to equip all of them with lighting kits. So I went ahead and created three more.


Nothing new here of course. Maybe except for the fact, that those kits definitely turn out better and better with each piece I make. Perhaps one day I should be selling them?

But let's get back to the topic. One thing I did not like that much in the kit I made for my first car was that the light was not bright enough. I've used there a 4.7kOhm resistor, exactly the same that I use in N scale. Seems it was just too much for a G scale model and I decided to do something about it.

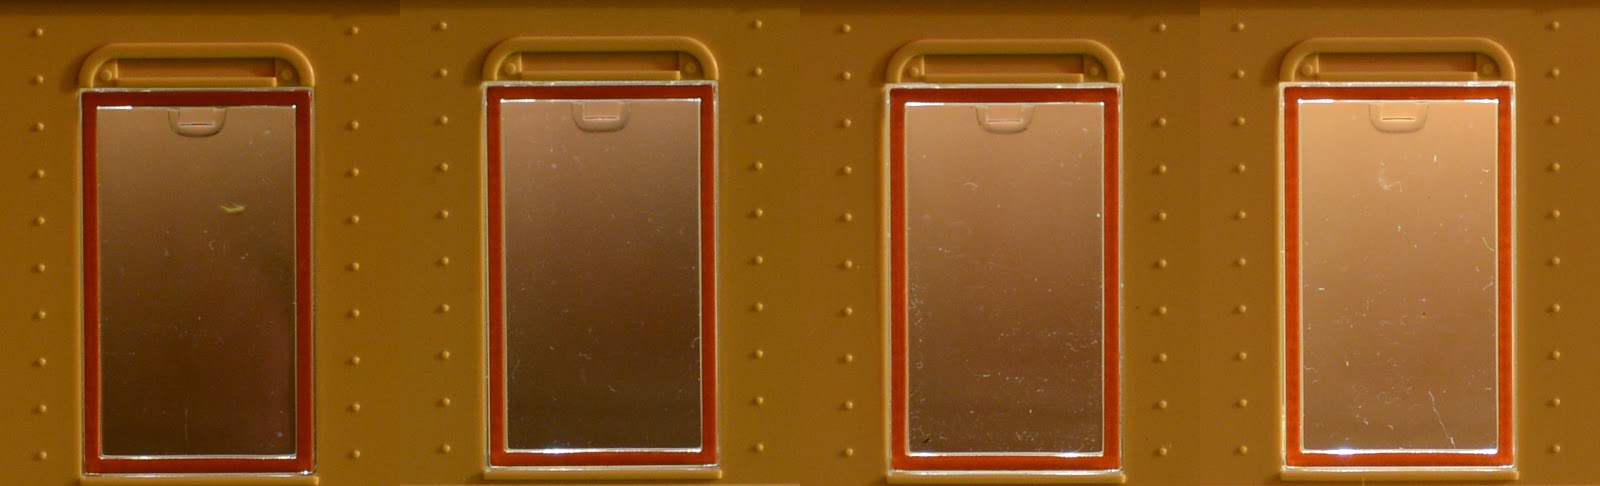
I was not sure what the correct value for my LED-current-limiting resistor would be and I decided to experiment. I equipped each of the kits with a different resistor and compared the results. Here are the photos of my cars, taken at the very same camera settings using different resistor values:


These photos do not really look that different. The change is actually much more visible in real life. But still - if you compare 1kOhm version with the 4.7kOhm one, the difference is obvious.


With the 4.7kOhm resistor, the car is just slightly lit on the inside. And with the 1kOhm version not only the inside is well lit, but the LEDs illuminate the outside of the car a little, too.

And of course the difference is perfectly visible if you compare just the sections of the original photos.


Personally I like the brightest version best. It just looks nice. There are two reasons however why I did not go for it:
  • While my personal opinion is that it looked nice, it did not look realistic any more. Realism is not my priority but... I hesitated to make my cars that bright.
  • With a decrease in the resistor value comes the decrease of the positive effect that the flicker-free capacitor gives. And with only 1kOhm the light was fading out much, much quicker when the power was cut.
In the end I decided to use 2kOhm resistor for all my cars. It seemed like a good compromise. Here's the end result:


The point of the exercise? It pays off to make something yourself. You have then a full freedom of customizing it and you can get a result that you're really happy with!

Wednesday, 26 August 2015

My visit to Miniatures and Trains Park

This visit was not planned. I was spending summer holiday with my family at the Baltic Sea when I saw a banner advertising the Miniatures and Trains Park. Quick check at the map and I found out it was only 16km away. I simply could not pass that opportunity.

Seaside Miniatures and Trains Park (http://www.park-miniatur.pl/) is located at the outskirts of the city of Dziwnów in the north of Poland. The place would be difficult to find if it wasn't for all the ads leading to it. So even though you have to navigate some local roads to get there, you won't get lost for sure.


The park is quite big considering it's a private owned area. There are paths to walk and benches to sit but also snack, ice-cream and souvenir stands. It's definitely a place where you can spend more time than what is just needed to see everything. You can simply stay there and enjoy the day.


The park focuses on two major topics.

Topic #1 is the miniatures of real world lighthouses. I did not count them but it felt like I've seen at least a dozen. And they were big. They're supposed to be in the 1:10 scale with some models reaching over 4m (~13ft). The biggest ones are definitely impressive.


Topic #2 is of course trains. Those are just well-known G-scale sets from LGB, PIKO and Bachmann. Some of them are equipped with sound, some are not. I've counted 10 running trains at the time of my visit and they were definitely fun to watch.


Of course the trains and the lighthouses do not really fit together because of the difference in scale. And the park does not even try to present them very close to each other. So both topics are independent and are meant to be enjoyed separately.

A few more words about the train layout...

It definitely feels huge. It's supposed to be over 1km of track and it does feel like it. Even though that entire length is split into three smaller layouts (one being reserved to Thomas & Friends theme), the longest loops will make you lose the track of the trains completely. That's really cool!

Of course with a long track and a large area comes a lower attention to detail. Unlike the indoor layout I visited previously, the park does not offer a lot in terms of 'scenes from life'. It does have 4 train stations which are very nice and fit perfectly but that is all. No towns, very few people figures and almost no cars.

All in all, I enjoyed my visit to the park very much. My family had a great time, too, even though my daughters are not interested in trains. Side activities were good enough for them to make the time spent there a pleasant experience. And I highly recommend the place to anyone travelling in the area.

Here's a video I shot during the visit:


And quite a lot of photos: