Recent Posts

Monday, 26 February 2018

Piko 37531, G-scale V36 diesel locomotive

The first weeks of year 2018 have brought several very interesting discounts on some of the Piko products. I have previously described my purchase of the Taurus electric locomotive in G-scale, and I also mentioned it wasn't the only bargain I found. The other one was a V36 diesel engine, which I'm going to take a look at now.

This locomotive is rather small, so the packaging is not very big either. G-scale rolling stock usually comes in larger boxes. And similar to what I encountered in case of the Taurus engine, the cover does not really reflect the real item inside. The picture shows a black model...


...while Piko 37531 is actually a green one what is confirmed by the product tag on the lid of the box.


The locomotive seems to be very well protected inside the polystyrene foam packaging. The usage of the term "seems" is not a coincidence here. I will come back to it later in my article...


The complete set consists of:
  • a V36 locomotive in green livery
  • two optional central buffers for narrow gauge operation
  • four extra handrails for individual installation
  • a set of manuals

V36 garden locomotive set

The mentioned handrail details come in a small bag which contains also a short installation guide.


Adding those parts is very easy - you just push them into the designated holes. They're a tight fit, and it does not seem like any glue is needed at all. They feel fragile though so it's a pity Piko provided no spares in case of any accidents.


The model's manual is available in English and German, and it covers all the relevant topics. That includes the DCC conversion procedure - a must have for a digital layout owner like me.


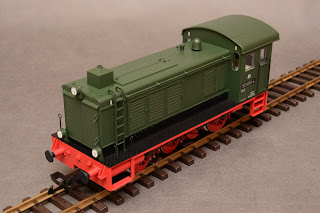
It's photo time! Here's what the Piko V36 in G-scale looks like:

Piko 37531
b

It looks really, really good. The model is nothing fancy but there's not much to complain about, either. I would even say the amount of details is exactly what we need on a locomotive that is intended for outdoor usage. I'd rather not have too many small parts that could get damaged whenever my train hits a shrub that wasn't there a week ago. And let's not forget the original engine is not really a beauty either :)

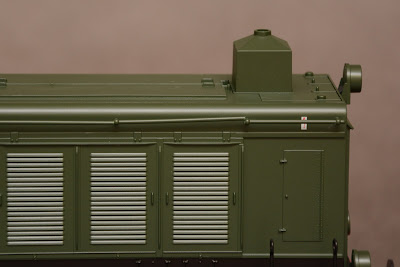
I really like the grills on the sides of the locomotive, and the ladder at the front is very attractive, too. The paint job is simple but flawless and the number plates definitely add to the look. I'm very happy that in this case Piko decided to include an engineer figure inside the model. He's a twin brother of my Piko BR80 driver, but that is perfectly fine.

The only real issue is that my model arrived damaged. It would seem that the packaging Piko uses is indestructible. And it would also seem the way the MSL store delivers the merchandise is even more secure. But still the grab irons on one of the sides got broken somehow which can be easily seen in the photo below. I can't say I'm happy about it, and it was probably a reason good enough to ask for a replacement. But instead I just used two drops of glue to fix the issue. And I hope it solves it for good...

g scale locomotive damage

Let's go back to the good stuff. A very nice feature of the model are its light functions. The locomotive offers three lamps at the front, three at the back and an interior cab illumination. The lights are bright and look really great. Just look at the photos below!


But they do look a little bit weird, too, don't they? Well, it's not a photographer's mistake. The front headlights are indeed cold white, while the back lamps are warm colored. Is it intentional? Or is it Piko's mistake? I do not know the answer but I can't say I really mind it.

***

I'm actually glad that items disappear from the Piko's annual catalogs, as it clearly makes their prices go down. It would seem I bought the described model at the best possible moment in the product's lifetime. If it wasn't for the merchandise damage, I'd be 100% happy with my purchase. But instead my satisfaction is at a mere 99% :)

Saturday, 17 February 2018

Peco KNR-44, N-scale gondola wagon assembly kit

I was in need of some old, useless wagon to realize an idea that required a functional N-scale chassis. Turns out buying such item cheaply in Poland is a considerable challenge and I had to order one from abroad. And if it had to be imported anyway, why not try something new at the same time?

That's how I learned about Peco wagon kits. They're incredibly cheap and they allow building complete unpainted freight cars (meaning - they must include a chassis, too). Several types of those are available and I picked the one containing parts for an open "steel" gondola car. Peco item KNR-44.


The product's box is small and simple. And the content is just two bags of elements and a short - but very much comprehensive - manual.

Peco gondola car building kit

It's less than 10 parts in total. The wheels are plastic and the couplers are as simple as possible. There's however a piece of weight included which should improve the car's performance.


At first I had some serious doubts about the assembly because the model simply wouldn't hold together. The secret however is in the two provided screws - once those are tightened, the vehicle becomes one. No glue is required at all.


It does not look that bad considering it's a £4 product. The plastic wheels are crap and the car runs much better once they're replaced with metal ones. The biggest disappointment however are the couplers which do not offer any flexibility or resilience at all. They do work however and maybe I should not be complaining too much given the price point.


So why the heck did I buy it in the first place? Well, I'm working on a method of recording cab-view videos on my N-scale layout. So I removed some pieces from the Peco model and I installed a miniature camera there. I will soon be sharing the results on my blog...

N scale layout filming chassis

To summarize - the Peco kit is nothing spectacular. It's very simplistic and its quality is nowhere near the products I'm used to. It's not however all that bad either. Given its price, it might be a good base for some small N-scale projects. You just have to be aware that this product is not a bargain, it's just cheap.

Friday, 9 February 2018

Faller 232242, N-scale moated castle

I needed a small project to fill up the evenings during a winter break trip with my family. The project had to be compact, so I wouldn't have to carry too much with me. And it had to be fun, so I needed something that I would really enjoy. And one of the most enjoyable activities for me is assembling plastic building kits...

So I got myself a little N-scale structure to build. It's a "moated castle" in N-scale. Model 232242 manufactured by Faller...

faller 232242 a castle and a moat

The provided box is very nice and colorful. That is until you actually open the product. Then it turns out the real packaging is just a generic cardboard container and the beautiful part is simply an extra paper wrap. It really doesn't matter and I do not really care, but it caught me by surprise...


As we dig through the content, the very first parts we find are the baseplates. One for the castle itself, and one for the moat around it. It is a "moated castle" after all :)

moated castle baseplate

Then we find a significant number of stone walls elements...


...as well as the roof, the windows and some small details.


A manual is included, too, and it shows the build process step by step. Not everything is however 100% self-explaining here, which led to some mistakes on my side. But overall it's very useful and there isn't much to complain about...

There are also two paper inserts with printed curtains and a sticker set included. The stickers will be used to create a flag located at the very top of the tower. Of course a Polish flag is missing - I will be forced to make my own.


The build is fun but it's very short. One could easily do it in one day. I split it into four evenings and allowed to glue to dry well between the sessions. The trickiest part for me was actually putting the paper inserts into the castle. They were a very tight fit, and for a moment I even considered re-assembling them from scratch. But with some extra force they finally went in...

Here's the complete castle. And with a Polish flag, too!

a castle with a polish flag

Well, that was fun... while it lasted. The model is a nice one and the provided moat-base is a great opportunity for extending the scenery in the future. Just fill it with some fake water, add shrubs around and it will look great. I like it!

As I already mentioned there are some mistakes I've made because of the slightly lacking manual. I've noticed two:
  • I added the round window frame from the inside while it should have been added on the outside
  • I cut the three small flag details too short and they are not attached to the roofs by their poles but directly by the globe-shaped parts
The differences are well visible in the comparison photo below:

castle model assembly mistakes

Of course those do not matter at all and the castle is still fully usable and beautiful. Now I just need to find a layout I can put it on :)