Recent Posts

Monday, 20 February 2017

Eaglemoss Electric Train collection, Issue #1

Here I am, sitting with my family in a restaurant having lunch on our winter holiday. The food is pretty good, the kids are not being very loud, and the wife seems happy. You could say the only thing missing there is my hobby...

Suddenly a TV-set playing in the background shows the following ad:


What was that? I need to learn more!

I spend the evening going through the webpage: elektrycznakolejka.pl. And I finally understand. A company called Eaglemoss is releasing a series of magazines that will come with elements allowing you to build your own 1:87 scale train layout. 100 issues will be published over a period of two years. And the first issue is available now.

Next morning I'm at a magazine stand and it's there. For 4.90 PLN (~1.15 Eur) I can buy the first Electric Train magazine in the series. And it comes with a piece of a track and an H0 scale passenger car. Obviously I bought it immediately!


And since issue #1 was so cheap, I bought 3 pieces instead of 1. No matter how bad it was going to be, it had to be worth 1 Eur!


Let's take a look at the content...

The back side of the package shows the predicted outcome of the build. I understand this is what I'll be able to create using the parts from all the magazine issues combined together. There's clearly some inconsistency here, since the picture shows two locomotives, and I'm pretty sure I can get only one.

The layout looks simple but it's nice and colorful. It measures 105 x 174 cm.


Here's the H0 scale passenger car included in the set and the straight piece of a track. The coach looks very generic - I guess they design and manufacture just one model and release it across all the countries.


One thing that we can definitely say about the track piece is that it was made in China. It  doesn't look great but it's not completely crappy either. The pieces connect well enough, although you have to pay attention to what you're doing, since the rails are neither 100% straight nor flat.


We can say even less about the car, since it has no markings at all. The wheels are made of plastic, and I think we can safely assume it was made in China, too.


The couplers work well and the cars can be connected and disconnected easily. They roll pretty well, too, considering they were 1 Eur each.


They're also compatible with cars from other manufacturers. No issues spotted here.


In general the car is not as bad as I thought it would be. It's nowhere near German models quality and it's made of a much cheaper plastic. But the overall feeling is pretty good (considering the price!).

Here's what the coach is made of:


About the magazine itself. I have to say this is the biggest disappointment, since issue #1 has almost no content at all!

It mainly focuses around advertising how great the entire collection is going to be...


...what we'll find in the next issue...


...why we should subscribe to receive each issue by mail...


...why we should subscribe to the premium option...


...and what we can do instead, if we don't subscribe.


The real content is a description of a V40 locomotive...


...and a poster featuring that engine.


There's also a historical article about trains in Poland. The nice thing is it features a photo of the main train station in my hometown.


No modelling tips? No good advices? No basic landscaping techniques? I really hoped (and still hope) for more!

Let's try to analyze whether collecting all the issues makes sense at all. Cost wise we're looking at:
  • Issue #1: 4.90 PLN
  • Issue #2: 14.99 PLN
  • Remaining 98 issues: 29.99 PLN each
Total: 2958.91 PLN which is around 680 Euro. That's for a layout of a rather small-medium size but featuring all the landscape elements and a train. Of course not everything is included - the base and some of the tools still need to be provided by the modeller.

Is it worth it? I'd say that depends...

If you're serious about building a layout, you should really spend more and go for well-recognized brands. The collection started with cheap Chinese parts and will most probably continue with those. And I'm really worried what the locomotive will be like...

But if you're not so serious, and you just want to enjoy it together with your kids without fully committing to the hobby, it might be just for you. The Chinese elements included in the first set are good enough for that, and unless the collection takes a wrong turn, the final layout might actually work pretty well.

I have subscribed. I'm curious what it will be like. H0 is not even my scale, so I'm not treating it that seriously. But I really hope to learn something new on the way, and if the collection does not deliver this sort of experience, I can always quit...

Saturday, 18 February 2017

Kuehn-modell 91185: N-Scale double-deck PKP rail car set

The only really popular train modelling scale in Poland is H0. No wonder the manufacturers are not tempted to release any Polish State Railways rolling stock for other systems. One notable exception in 2016 was a set of two double-deck passenger cars in N-scale. It was released by a little-known Kuehn-modell company which for me was just another reason to see what it's worth. In the end I got it as a gift, but the product can be bought for around 70€ on Ebay.

Its catalogue number is 91185. It comes as two separately packaged (but taped together) transparent boxes giving a very good view of the models inside.


Separating the elements shows how similar looking they are...


...but the descriptions on the side prove we actually get two different coaches in this set.


Unboxing time. The model is well protected inside the plastic mould and additionally wrapped in a transparent foil. The paper insert unwraps into a promising looking manual. No other parts (alternative couplers, anyone?) are included.


The manual is available in German only which is disappointing. At first I had an ambitious plan of getting familiar with it. But then I noticed it contained information about digital control and concluded it could not be very much related to the product I got. This tricked me into ignoring the chapter about interior lighting which I regretted later.


And here's the model itself. First impression - it looks beautiful.


I like the coaches a lot. They offer a very good level of moulded details and a very, very nice paint job. Not only are they colourful but the quality and crispness of the small painted parts is really good. The Polish labels ("Bydgoszcz", "Ogrzew. naw.") are free of any mistakes and clearly readable. I think I'm going to start collecting Polish trains after all!


So I'm very happy with the look but how does it ride? Unfortunately this is where some issues came up...

The cars would barely move when pushed on the track. There was clearly some resistance in the riding mechanisms. That was extremely surprising for a brand new product. So I investigated...

...and found a problem. The wheels were falling out from the bogies. They "seemed" like a good fit for most of the time but clearly moved up and down and did not really stick in their sockets. At one point the wheels literally fell out on the floor.


I've contacted the manufacturer about the issue and got the following response:

Remove the bogies from the car and then the wheels from the bogie. Now you can press the bogie bearings for one axle with your fingers together and hold this for some seconds. Please adjust your force carefully and don't damage the bogie... Based on this procedure the bearings can come 0,2 ... 0,3mm more closer together and this is enough for a more stable wheel bearing. You can insert the wheels now and clip the bogie to the chassis.

I somehow hoped for an immediate replacement but if the problem can really be fixed, why not try it? And so I removed the bogies. Surprise!

The models are prepared for interior lighting installation. This is probably described in the German-only manual but I decided to ignore this document due to my laziness. And here is what I've missed!


Hoping for more surprises I kept opening the coach. Here's a photo of the car's interior details.


Alright, so that power pick-up mechanism on the bogies does justify some of the drag the coaches are experiencing BUT it does not explain why the wheels tend to fall out. So did the advice from Kuehn-modell help at all?

At first it did not. Squeezing the bogies with fingers is not enough to make the plastic "remember" its new desired shape. After a few minutes the problem is back. So instead I've used some clothes-pegs and kept the parts pressed for several hours. This procedure seems to have helped and the wheels do stay in their sockets now.

Summary


So what's my take on the Kuehn-modell double-deck coach set? I absolutely love its look and the painted details in particular. I appreciate the fact that the manufacturer prepared the models for lighting installation. And I'm very, very excited to finally own a significant Polish State Railway model.

I'm however also very disappointed by the operational issues. I've never ever had to fix a newly purchased rolling stock piece to this extent. And I honestly don't think I should be forced to do so. The Kuehn-modell company should really think about:
  • improving its quality control
  • providing immediate replacement for any faulty product
But to be fair - the coaches work fine after I fixed the falling-out-wheels issue. They still show some resistance on the track but this is not a surprise for a model with power pick-ups. In the final test I've used my weakest locomotive with these coaches and it was able to pull them just fine. So maybe I should be satisfied after all?

Wednesday, 8 February 2017

My first 3D printed G-Scale street lamps

I've had my 3D printer for a few weeks now and the time has come to start producing useful elements for my layout. This is a rather straightforward process and the key to success is a good blueprint for the item. Anyone can design anything they want but starting with your own creation is rather ambitious. Luckily there's a site called Thingiverse which holds a huge database of models prepared by amateur contributors.

Quick search using the "g scale" keyword revealed several design that could be of interest. A set of street lamps created by user SlashDev caught my eye and I decided to make it my first project.


I've downloaded the necessary files and made some modifications to the original design:
  • I've made the lamps a little taller
  • I've added an anchor allowing installation in a drilled hole
  • I've designed a glass shade for the lamps
A free 3D editor Blender is the tool that allowed me to make all those changes.


After that, the printing was easy. It all worked right away. Each lamp is printed as two pieces which need to be glued together later on. Each half takes about 2 hours to complete using the high quality settings.


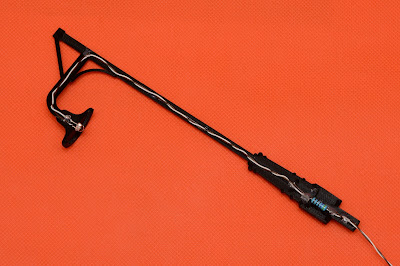
The light poles are empty inside which ensures the space for all necessary wiring.


A 5mm LED and a resistor fit perfectly inside the body.


A hot glue gun can be used to help hold everything in place and make the next step easier.


All that is left is gluing the two pieces together. The lamp is (almost) ready.


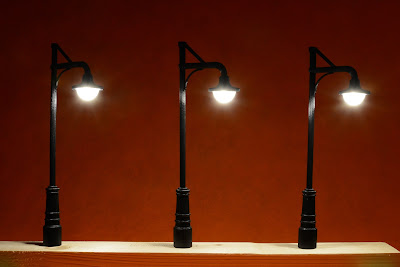
And it just works. At this point I've realized I wanted a glass shade to make the light more diffused.


Designing the globes was very easy. Each is just a half of an empty sphere. I have to say I really like what I've made here.


A two-arm variant is a similar story. It's equally easy to print and wire up.


There are a few challenges that should be mentioned:

My cheap printer is not perfect. And the two sides of each lamp do not fit each other 100%. This was however to be expected from o DIY machine, and they fit well enough to be perfectly usable.

The material I've used for printing is called PLA. It's very easy to use but probably not that weather resistant. Actually it's advertised as biodegradable. The time will show how well this kind of plastic can survive my outdoor conditions.

Gluing was not a piece of cake. The best glue for PLA is the cyanoacrylate. I was however afraid to use it considering how quickly it acts. I've used a regular plastic cement instead. It worked but required some patience. We'll see whether it holds in the long term...

Being a contributor by nature, I've decided to share my modified design for the lamps. The files necessary for printing can be downloaded here: http://www.thingiverse.com/thing:2064924


I've printed all the lighting I needed for my railway platforms. The next step is producing around 40 of roadside lamps. I'm going to design those by myself from scratch. And you can definitely expect another blog post covering exactly that :)